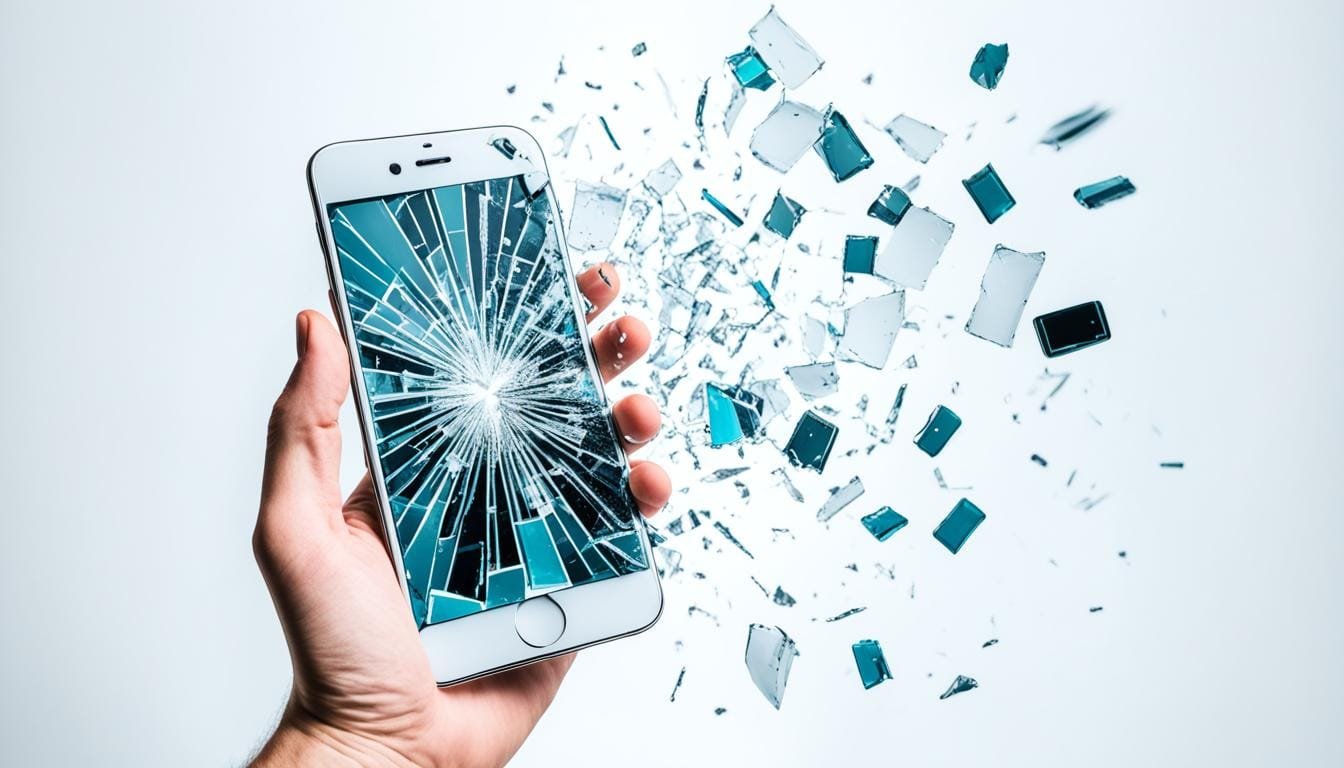
How to Remove Pressure Marks on an LCD Screen Safely
January 13, 2025 | by search.wizards.info@gmail.com

To safely remove pressure marks on an LCD screen, it's essential to understand the causes and prevention strategies, as well as the proper cleaning materials and techniques. Use a microfiber cloth, soft-bristled brush, and LCD-safe cleaning solution, avoiding household cleaners with harsh chemicals. Turn off the device and unplug it before cleaning, then gently apply the solution to the mark, avoiding saturation. Dry the screen using air-based methods to prevent damage and inspect the area under varied lighting conditions for remaining imperfections. By following these steps, you'll be well on your way to effectively removing pressure marks and maintaining your LCD screen's ideal performance and longevity.
Key Takeaways
- Use a microfiber cloth, soft-bristled brush, and LCD-safe cleaning solution to clean the screen and minimize the risk of pressure marks.
- Apply a small amount of pressure mark remover solution, specifically designed for LCD screens, to the affected area with gentle application techniques.
- Avoid using household cleaners, heat-based drying methods, and stacking heavy objects on top of the device to prevent further damage.
- Conduct thorough inspections under varied lighting conditions to identify subtle imperfections and repeat the removal process if necessary.
- Adopt a routine maintenance schedule, including regular cleaning and inspections, to ensure optimal screen performance and prevent major problems.
Understanding Pressure Marks on LCD
Understanding the causes and prevention strategies for pressure marks is essential for maintaining the integrity of LCD screens.
Prepare Cleaning Materials and Tools
To effectively remove pressure marks from an LCD screen, you'll need to assemble a set of gentle yet effective cleaning materials and tools. This is vital to avoid inflicting further damage to the screen's delicate surface.
For safe and efficient cleaning, gather the following essential supplies: a microfiber cloth, a soft-bristled brush, and a cleaning solution specifically designed for LCD screens. Avoid using household cleaners or chemicals, as they can damage the screen's coating or leave streaks and residue. Instead, opt for a gentle, ammonia-free cleaning solution that is specifically formulated for LCD screens.
When selecting a microfiber cloth, choose one that is lint-free and has a soft, smooth texture. This will help prevent scratches and guarantee a streak-free cleaning process. A soft-bristled brush can be used to gently sweep away any debris or dust particles that may be obstructing the pressure mark.
It is essential to use safe materials that are compatible with LCD screens to avoid causing further damage. Always read the labels and instructions of the cleaning supplies to verify they are suitable for your screen.
Turn Off Your LCD Device
The LCD device must be turned off before attempting to remove the pressure mark, as any static electricity or screen activity can interfere with the cleaning process. This is a vital step to guarantee device safety and prevent any potential damage to the screen. Turning off the device also helps to prevent any accidental screen touches or button presses that could exacerbate the pressure mark.
| Device Type | Turn Off Method | Importance of Turning Off |
|---|---|---|
| Smartphone | Press and hold the power button until the device shuts down | Prevents accidental screen touches or button presses |
| Laptop | Shut down the laptop and unplug the power cord | Prevents static electricity buildup and screen activity |
| Tablet | Press and hold the power button until the device shuts down | Prevents screen activity and guarantees a static-free environment |
| Desktop Monitor | Turn off the monitor and unplug the power cord | Prevents screen activity and guarantees a static-free environment |
| Gaming Console | Shut down the console and unplug the power cord | Prevents screen activity and guarantees a static-free environment |
Inspect the Pressure Mark Closely
With the LCD device safely turned off, attention can now be directed towards the pressure mark itself. This vital step in the removal process involves a thorough inspection of the mark to identify its characteristics. It is important to examine the mark under adequate lighting conditions to guarantee accurate mark identification.
Hold the device at an angle to observe the mark from different perspectives, taking note of its size, shape, color, and location on the screen.
Inspect the mark for any signs of screen damage, such as cracks, scratches, or delamination. Check if the mark is raised or recessed, and whether it has a distinct border or is diffuse. Observe if the mark affects the display's brightness, contrast, or color accuracy.
Note the mark's proximity to the screen's edges, corners, or any other sensitive areas.
Accurate mark identification is critical in determining the most effective removal method. A detailed understanding of the mark's characteristics will help in selecting the appropriate removal technique and solution, minimizing the risk of further screen damage.
Take your time to thoroughly inspect the mark, as a hasty or incomplete assessment may lead to ineffective removal attempts or, worse, exacerbate the damage.
Apply Pressure Mark Remover Solution
One essential aspect of removing pressure marks from LCD screens is the application of a suitable remover solution. This solution plays a significant role in breaking down the pressure mark, allowing for its safe removal. When selecting a remover solution, it is critical to choose one that is specifically designed for LCD screens and is free from harsh chemicals that can damage the screen.
| Remover Solution | Active Ingredients | Safe for LCD Screens |
|---|---|---|
| LCD Screen Cleaner | Isopropyl alcohol, deionized water | Yes |
| Pressure Mark Remover | Ethanol, distilled water | Yes |
| Glass Cleaner | Ammonia, sodium lauryl sulfate | No |
| Screen Protector Cleaner | Methanol, glycerin | No |
| DIY Solution | White vinegar, water | No |
When applying the remover solution, it is essential to follow safe cleaning techniques to prevent damage to the screen. Gently pour a small amount of the solution onto the pressure mark, taking care not to over-saturate the area. Avoid applying excessive pressure, which can exacerbate the pressure mark or damage the screen. By using a suitable remover solution and following safe cleaning techniques, pressure mark prevention is more likely to be successful. Additionally, this approach helps to maintain the integrity of the LCD screen, ensuring it remains in prime condition.
Use a Microfiber Cloth to Gently Rub
Two gentle rubs with a microfiber cloth can make a significant difference in removing the pressure mark from your LCD screen. This is due to the microfiber advantages, which include its ultra-fine fibers that effectively pick up dirt and debris without scratching the screen.
When used in conjunction with the pressure mark remover solution, the microfiber cloth becomes an essential tool in the cleaning process.
To utilize the microfiber cloth effectively, employ gentle cleaning techniques that avoid applying excessive pressure. Start by gently placing the cloth on the affected area, guaranteeing complete coverage of the pressure mark.
Then, using a gentle circular motion, rub the cloth over the mark, applying minimal pressure. Repeat this process once more, and inspect the screen to assess the effectiveness of the removal process.
The microfiber cloth's soft and gentle nature makes it an ideal tool for cleaning delicate LCD screens. Its ability to effectively remove dirt and debris without scratching the screen is unparalleled.
Remove Excess Moisture and Residue
After gently rubbing the pressure mark with a microfiber cloth, any remaining moisture and residue must be removed to prevent streaks and further damage to the LCD screen. This is a critical step in the pressure mark removal process, as excess moisture can seep into the screen's pores and cause permanent damage.
To effectively remove excess moisture and residue, use a gentle cleaning solution specifically designed for LCD screens. Apply the solution to a clean microfiber cloth, and gently wipe the affected area in a circular motion. Be cautious not to apply too much pressure, as this can push the moisture further into the screen.
| Moisture Removal Method | Effectiveness | Risk Level |
|---|---|---|
| Gentle cleaning solution | High | Low |
| Compressed air | Medium | Medium |
| Absorbent cloth | Low | High |
The table above highlights the effectiveness and risk level of various moisture removal methods. A gentle cleaning solution is the recommended method, as it effectively removes excess moisture without posing a high risk to the LCD screen. Compressed air can also be used, but it may not be as effective and poses a moderate risk of pushing moisture further into the screen. Absorbent cloths should be avoided, as they can leave behind streaks and residue, increasing the risk of further damage.
Inspect and Repeat if Necessary
The pressure mark removal process is not complete until a thorough inspection confirms the mark's eradication; a cursory glance can be deceiving, as subtle imperfections may persist. A detailed examination is vital to guarantee the mark has been completely removed, as any remaining imperfections can compromise the screen's integrity and affect its performance.
Conduct the inspection under different lighting conditions, using a combination of natural and artificial light sources. This will help reveal any residual marks or imperfections that may not be immediately apparent. Pay particular attention to the area where the pressure mark was located, as well as the surrounding screen surface.
If the inspection reveals that the pressure mark is still visible, repeat the removal process as necessary until the mark is completely eradicated. It is essential to be patient and meticulous during this process, as rushing or taking shortcuts can lead to further damage to the screen.
Regular inspections are an integral part of screen maintenance, helping to identify and address potential issues before they become major problems. By incorporating regular inspections into your screen maintenance routine, you can help extend the lifespan of your LCD screen and guarantee peak performance.
Dry the Screen Thoroughly Afterwards
Screen dry-down is a critical step in the pressure mark removal process, as any residual moisture can compromise the screen's coating or seep into the display's internal components, causing long-term damage or malfunction.
It is vital to employ effective drying techniques to guarantee moisture control and prevent any potential damage.
To achieve a thorough dry-down, avoid using heat-based drying methods, such as hairdryers or ovens, as they can cause thermal stress to the LCD screen.
Instead, opt for air-based drying techniques, which are gentler and more effective.
- A single drop of water can spread across the screen, leaving streaks and marks that can be difficult to remove.
- Inadequate drying can lead to water spots, which can be a permanent defect on the screen.
- Moisture can seep into the screen's internal components, causing corrosion and electrical failures.
- Improper drying techniques can push moisture further into the screen, exacerbating the problem.
Preventing Future Pressure Marks
Proper care and handling of the LCD screen are indispensable in preventing future pressure marks. To guarantee the longevity of your screen, it is imperative to adopt a routine maintenance schedule that includes regular cleaning and inspection.
A soft, dry cloth should be used to wipe the screen, paying particular attention to areas prone to pressure marks. For more thorough cleaning, a specialized LCD cleaning solution can be used, but it is important to follow the manufacturer's instructions to avoid damaging the screen.
In addition to regular cleaning, it is essential to handle the LCD screen with care. Avoid applying excessive pressure, which can cause pressure marks to form.
When transporting the device, make sure it is properly protected with a screen protector and a sturdy case. Moreover, avoid stacking heavy objects on top of the device, as this can also exert pressure on the screen.
Frequently Asked Questions
Can I Use a Hair Dryer to Dry the Screen Instead of Air Drying?
When considering hair dryer safety for screen drying methods, it is not recommended to use a hair dryer to dry an LCD screen, as excessive heat can cause damage or warping, and instead, air drying is a safer and more reliable option.
Will Pressure Marks on an LCD Screen Affect Its Performance?
Pressure marks on an LCD screen can potentially compromise screen performance and display quality, as they may cause pixel damage, discoloration, or altered backlight diffusion, leading to reduced image clarity and overall display fidelity.
Can I Prevent Pressure Marks With a Screen Protector?
"A stitch in time saves nine" when it comes to screen protection; applying a high-quality screen protector can effectively prevent pressure marks, ensuring ideal display maintenance and preserving your LCD screen's clarity and performance.
Are Pressure Marks on an LCD Screen Permanent?
Pressure marks on an LCD screen are not always permanent, but their reversibility depends on the severity of the pressure mark causes and the quality of LCD screen care. Gentle marks may dissipate over time, while deeper impressions may persist.
Can I Remove Pressure Marks on an OLED Screen Using This Method?
When it comes to OLED screen restoration, pressure mark removal requires caution. While the method may be effective for LCD screens, it is crucial to exercise extreme care when attempting to remove pressure marks on OLED screens to avoid damaging the delicate organic compounds.
Conclusion
Expert Phone Repair Services in Queensland by Gadget Kings PRS
Trusted Repair Solutions for Your Devices
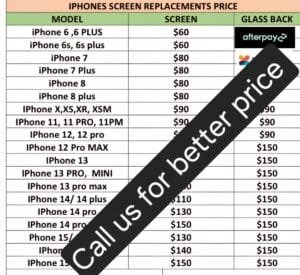
Gadget Kings PRS is the top-rated phone repair shop in Queensland, with convenient locations in Bray Park and Acacia Ridge. Their team of experts specializes in repairing a wide range of devices, including iPhones, Samsung Galaxy devices, iPads, tablets, and laptops.
Quick Repair Times and Affordable Pricing****
At Gadget Kings PRS, they understand the importance of getting your device back in working order quickly. That's why they offer quick repair times without compromising on quality. Their competitive pricing ensures that you receive top-notch repairs without breaking the bank.
Warranty-Backed Repairs for Your Peace of Mind****
Gadget Kings PRS is committed to providing exceptional quality repairs, backed by a comprehensive warranty. This ensures that you have complete confidence in their work and can rely on their expertise to get the job done right.
Excellent Customer Service and Positive Reviews****
Their dedication to customer satisfaction has earned them an impressive reputation, with numerous positive reviews from satisfied customers. Gadget Kings PRS takes pride in their exceptional customer service, ensuring that you receive a seamless and stress-free repair experience.
Convenient Locations in Bray Park and Acacia Ridge
With two convenient locations in Bray Park and Acacia Ridge, you can easily drop off your device for repair and pick it up at your convenience. Their expert technicians will work efficiently to diagnose and repair your device, getting you back up and running in no time.
Get Your Device Repaired Today!
If you're in need of quick phone repairs in Queensland, look no further than Gadget Kings PRS. Visit their website to book a repair, or stop by one of their shops in Bray Park or Acacia Ridge. Their team of experts is ready to get your device back in working order.
RELATED POSTS
View all

Fast Phone Repair in Doolandella – Expert Service
October 16, 2024 | by search.wizards.info@gmail.com

Phone Repair In Margate – Expert Service
October 18, 2024 | by search.wizards.info@gmail.com
 Choose repair by clicking (book now)